An usage example
In order to provide interested users the opportunity to test BIDSonym and thus evaluate if they want to utilize
it within their own datasets, we provide an example step-by-step walkthrough based on an open non-deidentified datasets.
1. The example dataset
Finding non-deidentified open datasets is hard and rightfully so, because the privacy of the participants needs to be protected.
Luckily for BIDSonym, there a few ones out there where participants (mostly they were neuroscientists themselves) provided their own data in a
non-deidentified manner. For this example, we decided to go with an adapted version of the MyConnectome dataset
which can be found on OpenNeuro, licensed under PDDL.
As it is quite a big dataset and for ease of use, we adapted the original dataset to only include data from one session (ses-006) and
added some fake identifiers to the .json sidecar files of the T1w image to illustrate the pseudonymization of the metadata information.
You can download this adapted version of the dataset (~1.3 GB) here.
After downloading it, please unzip the folder and place it under your preferred path. For this example, we will
assume it is placed under /Users/peerherholz/Desktop which is the path to the desktop of my (Peer) local machine.
Please remember to change the path to wherever you stored the example dataset!
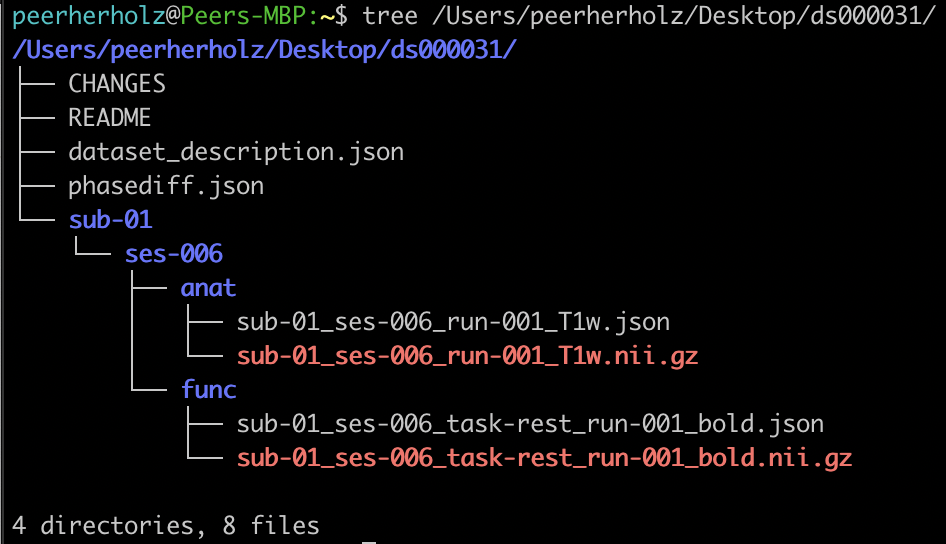
Using the GUI file manager or the terminal, you can have a brief look at the dataset and will see that it is a classic
BIDS dataset with the expected paths and files (which is obviously important given that BIDSonym is a BIDS App).
2. Installing BIDSonym
Of course we need to install BIDSonym before we can run it. Following the Installation instructions and guidelines,
we all utilize the Docker image and thus a containerized version of BIDSonym. Getting everything ready to run is fast and easy via:
docker pull peerherholz/bidsonym
This docker command will download the latest version of BIDSonym from DockerHub and
if everything worked as expected, you should see the following message:
Status: Downloaded newer image for peerherholz/bidsonym:latest
With that, we ready to test BIDSonym on the example dataset.
3. Running BIDSonym
Now that everything is in place, we can run BIDSonym on the example dataset.
After having a look at the Usage information again, we decide to
utilize pydeface as the defacing algorithm and use bet for brain extraction
prior to defacing (applying the default fractional intensity threshold of 0.5). Additionally, we want to delete the
meta-data information provided under InstitutionName, InstitutionalDepartmentName and InstitutionAddress to remove
information that could be potentially helpful in re-identifying participants. As the example datasets only contains data from
one participant, we will run BIDSonym in participant level mode and provide the participant label 01. Bringing everything
together, the full command looks as follows:
docker run -it --rm -v /Users/peerherholz/Desktop/ds000031/:/bids_dataset peerherholz/bidsonym \
/bids_dataset participant --participant_label 01 --deid mri_deface --brainextraction bet --bet_frac 0.5 \
--del_meta 'InstitutionName' 'InstitutionalDepartmentName' 'InstitutionAddress'
Based on your machine, it should only take a few minutes for this command to run. What will happen during that
is outlined and explained under Processing details. When you see your command prompt
again and no error messages along the way, BIDSonym is done and everything should have work as expected.
4. Inspecting the outputs
The expected outputs are described under Outputs and contain three core types: the
visual QC (i.e. graphics to help evaluate the applied defacing), imaging data (i.e. the defaced MR images) and
sidecar JSON and metadata .tsv files (i.e. the pseudonymized meta-data files and meta-data summary files). While
the pseudonymized MR images and .json sidecar files are stored in the BIDS root directory, the original non-deidentified files
are placed within sourcedata/bidsonym, organized by file type. All MR image related things can be found within the images directory
and all meta-data related outputs can be found under meta_data_info. Using a GUI file manager or the terminal, we can easily check if
we have all the expected outputs.
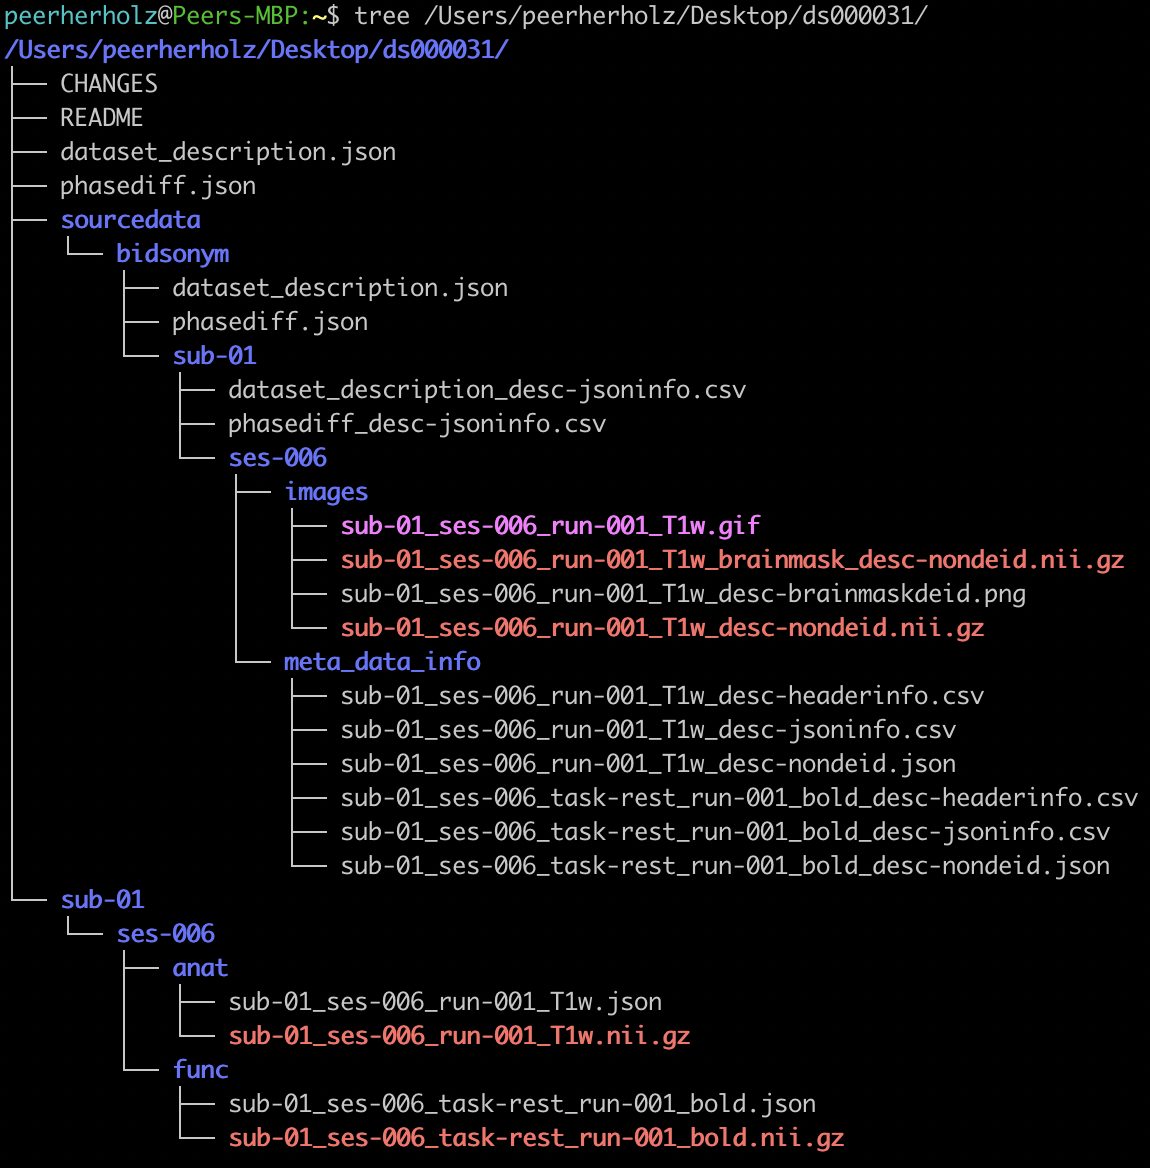
MR Image outputs
Based on BIDSonym’s workflow and the specified command above, we would expect the T1w image under
/Users/peerherholz/Desktop/ds000031/sub-01/ses-006 to be defaced, thus pseudonymized and the T1w image under
/Users/peerherholz/Desktop/ds000031/sourcedata/bidsonym/sub-01/ses-006/images to be the original non-defaced MR image.
Using e.g. a MR image viewer we can make sure that this is the case and if everything worked you should something like the image
on the left for the original non-defaced MR image and something like the image on the right for the pseudonymized MR image.
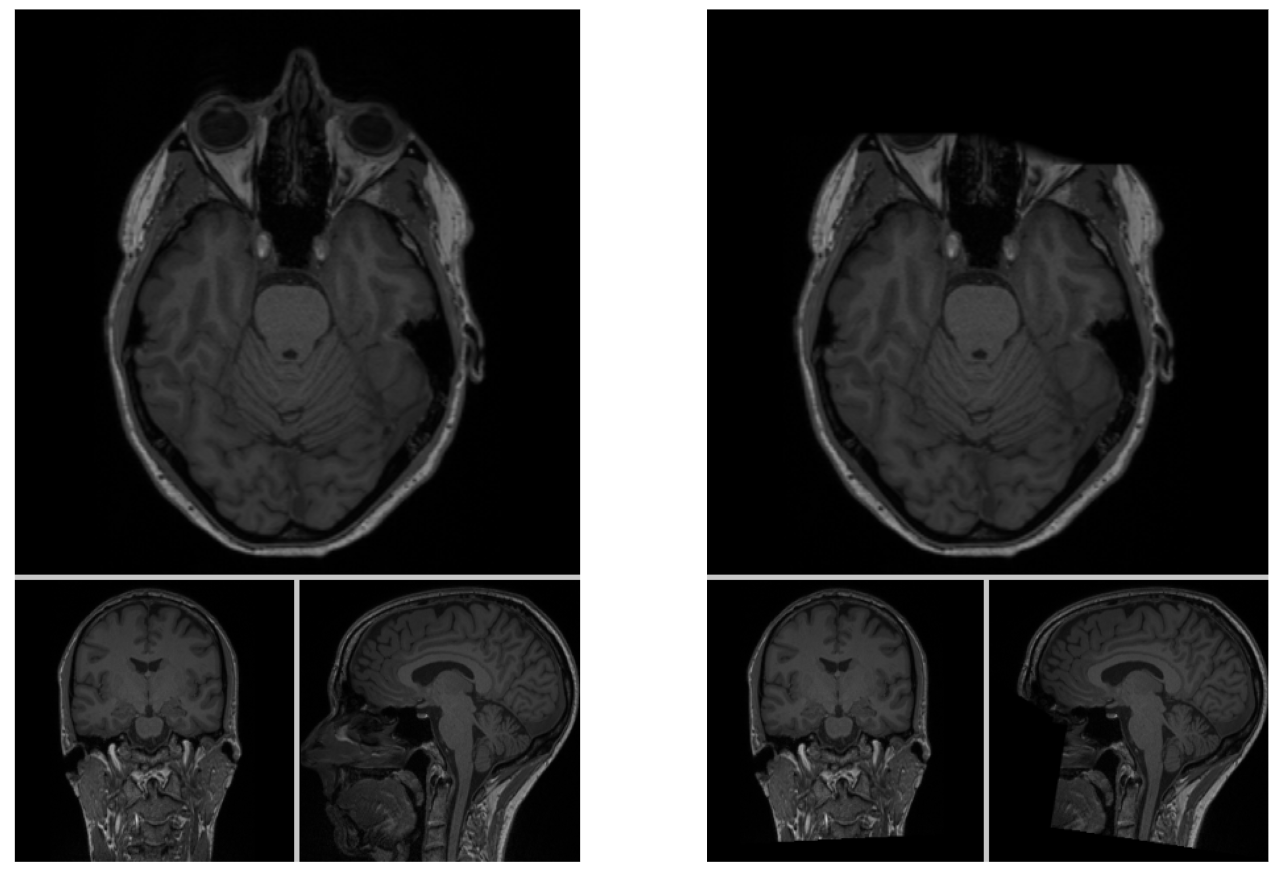
Within the sourcedata/bidsonym/sub-01/ses-006/images directory you should also find a .png image showing the brainmask extracted
prior to defacing overlaid on the defaced MR image, which should help you to check if the defacing worked or if it went
wrong (either removing too much (parts of the brain) or too few (leaving the eyes)).
Comparably, you should also find a .gif that goes through the defaced MR image slice by slice so you can check things more in-depth.

meta-data outputs
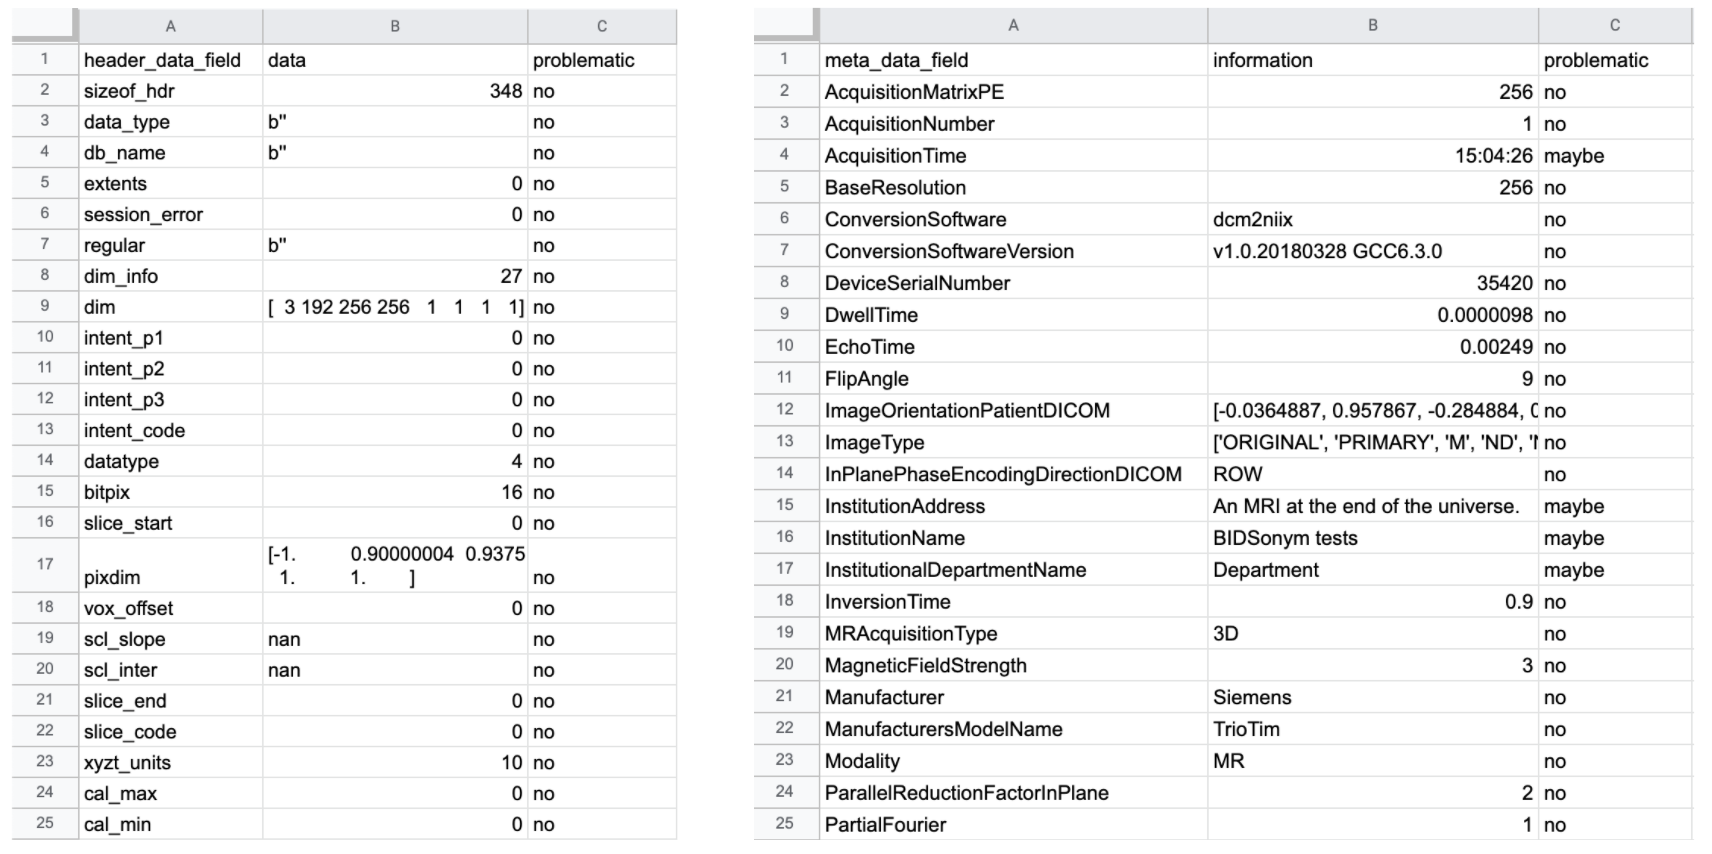
Regarding the meta-data we should find a set of files within sourcedata/bidsonym/sub-01/ses-006/meta_data_information. As outlined
above, we should have two different types of files: meta-data summary files and the original meta-data files. The first
provide a summary of the information present in each MR image’s header (on the left) and corresponding .json sidecar file (on the right) in tabular format and should
like this:
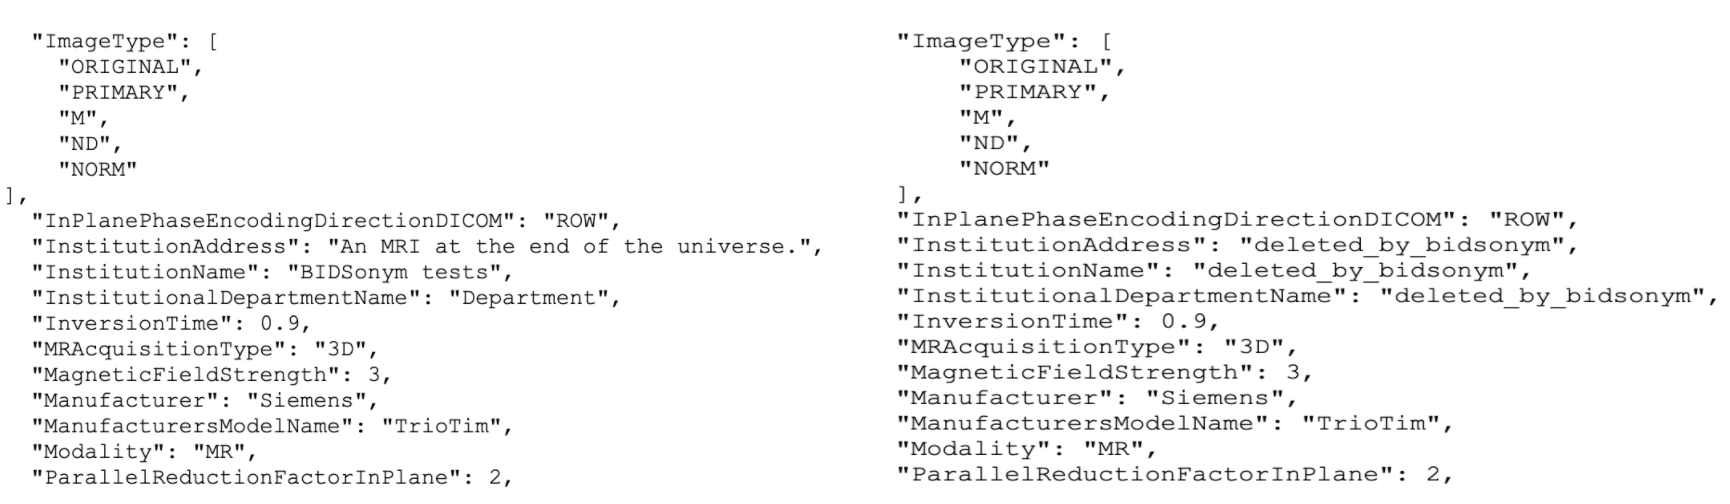
The latter (as visible above) are the original non-pseudonymized .json sidecar files, with the pseudonymized .json sidecar files being
stored in the BIDS root directory along the pseudonymized MR images. Based on our command within which we specified to delete the information
present in the keys` InstitutionName, InstitutionalDepartmentName and InstitutionAddress, we expect the respective information to be
replaced with the string "deleted_by_bidsonym" within the pseudonymized .json sidecar files (on the right):
5. Further steps
Assuming everything worked as expected, you could now proceed with subsequent data processing steps, such as quality control and preprocessing. If something went wrong, you
could check where the problem is coming from. You could also rerun BIDSonym with changed parameters to test different settings after you recreated
the original non-pseudonymized dataset (either from scratch or using the files under sourcedata/.)
Summary
We hope that this example provides a helpful walkthrough on how to utilize BIDSonym. If you have any questions, problems or comments, please don’t hesitate to open an issue.